Part 2 – Selecting a Lab and Performing Your Test
If you have not done so yet, please check out Part 1 – Defining your project and Obtaining a Quote.
You obtained quotes from a couple of vibration test labs. Your next task is to select a vibration test lab to perform your vibration test. Your selection should not be based upon price alone. Factors that should affect which lab you choose are capability, cost, timing, location, quality, and other special requirements.
Most importantly, the test lab must be capable of running your test. Running a successful vibration test is not easy. A good vibration test lab will make it look easy, but running a vibration test requires significant knowledge of vibration theory, fixture design, testing skills, and a skilled operator to run the vibration test equipment.
Of course, cost and timing should be a significant part of your decision. If one quote is considerably lower than the other quotes, then you should question that lab to see if they misunderstood the project requirements.
Location can be important if you need to haul bulky support equipment to the test lab. It can also be important if witnesses need to travel and be present during the test.
The lab should have up to date calibrated vibration test equipment. If you have never used them before and this is a large project, then it would be a good idea to schedule a visit to review their equipment and capabilities. If your company has special quality or other requirements, then review them with the lab. Special requirements could be handling, lifting or Electro Static Discharge (ESD).
Planning & scheduling your test
After you have selected a lab, it is time to schedule your vibration test. First contact the test lab to inquire about their vibration test schedule. The test lab may be backed up with large projects and may need some time to schedule your test. DES has multiple shakers with a goal to reduce scheduling time as much as possible.
If any special support equipment is required for the test, then it may take time to gather this equipment and to set it up. If rental equipment is required, then the time to ship the equipment from the rental company must be considered. Most importantly, significant time may be required to design and manufacture special fixtures.
Much or all of the planning could fall on the test labs shoulders if they are supplying everything. Expediting schedules is always an option, but you will likely have to pay more. It is important to know what each party is responsible to supply. For instance if assembly is required, who will supply the bolts? It is a lousy situation for all involved, to plan a test for weeks ahead and then to find that you are missing something during the test setup. Good communication with the test lab is very important!
Fixture Design and Manufacture
Most vibration test labs can design and make fixtures. Sometime you may have in-house fabrication capabilities. However, you may not have the experience to design good vibration test fixtures. Designing good vibration test fixtures requires specialized knowledge.
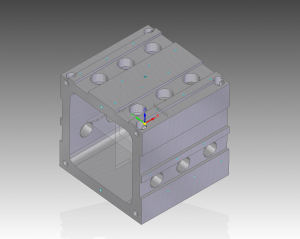
The vibration test fixtures should be stiff and light weight. They should have a high natural frequency. It is preferable that all resonances fall above the test frequency range, but many times that is not possible especially when testing to high frequencies of 2,000 to 3,000 Hz. A good rule of thumb is to make natural frequencies as high as possible without adding too much weight. Easier said than done! When designing vibration test fixtures, many more bolts are required than for static loading to securely join the fixture to the vibration table and increase the fixture resonances. Good materials for vibrating test fixtures are aluminum and magnesium.
Figure 1. Fixture Cube Designed by DES
Computer analysis software such as Finite Element Analysis (FEA) is a great tool for estimating fixture resonances during fixture design. If the lab is designing your fixture, inquire if they have FEA capability.
Test setup
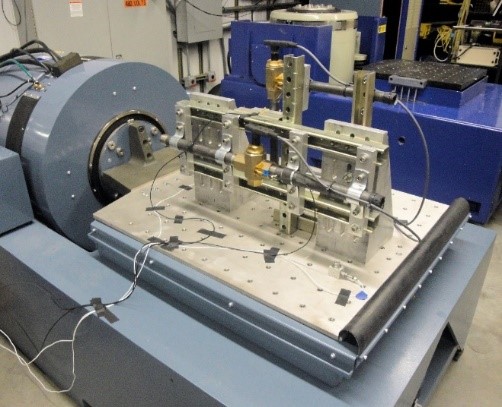
Setting up the vibration test on the shaker is the responsibility of the test lab. If the requirements are for your product to be operationally functional tested, then that may fall on your shoulders. It is very common for DES’s customers to bring support equipment to functional test their specialized products during the test. Many labs including DES, can also provide support equipment, but it if your product is very specialized, then it probably makes more sense for you to be responsible for this task. Again, good communication with the test lab is very important to determine the responsibilities for each party.

The test setup may also involve a trial run with the fixtures alone to scan for severe resonances. This is a good idea especially when testing to high frequencies of 2,000 to 3,000 Hz. Control problems could occur if the fixtures have a severe resonance in the frequency range of the test causing the shaker controller to abort. Sometimes (but not always) a large resonance can be “notched out” meaning that the test acceleration levels are reduced significantly at frequencies a little higher or lower than the resonance. Note that some test specifications will not allow for notching.
Running the vibration test
Finally you are ready to run your vibration test. Before starting the shaker, all support equipment and the DUT should be operated to verify that it is working acceptably.
Before the vibration testing begins, the shaker controller will first go through a “self-check” to make sure that the amplifier and the vibration accelerometers are connected and producing signal. It is looking for a “closed loop” between the controller, the amplifier and the control vibration accelerometers. Once the “self-check” is successful, the operator will start the vibration shaker. A skilled operator is taught to start up at low vibration levels. This is typically -12 (≈1/4 of full level) to -6dB (≈1/2 of full level) below the full vibration level (which is 0 dB). Thus if anything such as a loose bolt was missed during the setup, it can be caught before reaching full level. So it may take a couple of minutes to ramp up to full level even for an error free setup. Once at full level, the shaker controller will be constantly adjusting the vibration table to meet the specification. This is called running in “closed loop”. The definition of “closed loop” control is contained below. (Note, in some special cases the shaker can be run in “open loop”, meaning that the controller will not adjust the shaker, but that is a subject for another discussion). There are abort limits in the controller software to automatically stop the test in case an accelerometer or cable breaks. Also, if a failure occurs in the product or fixture, it will probably cause an abrupt change in the control accelerometer outputs causing the controller to abort the vibration test. In addition, a skilled operator knows that a change in the audible sound coming from the vibration test could be a sign of an imminent failure.
Now the shaker starts moving. What do you need to worry about? At this point, if everyone did their homework, then the only thing to worry about would be if vibration fatigue causes a failure in your product or if your product does not operate properly.
Most vibration tests are performed along three orthogonal axes, but only one axis at a time. Time will be needed when changing from one axis to another especially when switching from a horizontal to vertical axis. Fixtures will need to be unbolted from the table and the lab may need to disconnect from the horizontal slip table, rotate the shaker vertically and then install a vertical head expander. So if your vibration test is 8 hours in total duration, plan for extra time to switch axes which could mean that your test takes more than 1 day. The time required to switch to a different axis could be less than 1 hour to 1 day depending upon the size of the product, the complexity of the test fixtures and the support equipment.
Hurray! Your test completed, your product operated smoothly and no structural failures occurred. Now it is time to clean up and for the lab to provide a test report.
The definition of running in closed loop is the following: The vibration controller sends a drive signal to the amplifier. The amplifier powers the shaker using the drive signal causing it to vibrate. The vibration levels are sensed by the control accelerometers. The output from these accelerometers is fed back to the controller. The controller then adjusts the drive signal to make the vibration levels match the test specification.
Test report
The vibration test lab should provide a thorough, accurate, well written test report with prompt delivery as a final step. The test report should include:
- Photographs of test set-up
- Location of accelerometers
- List of test equipment used and calibration status
- Summary of the test procedure
- Plots of vibration data
- Visible observations of the product after the test and summary of the product operational test results (if product was operational during the test)
- Photographs of any product failures
In conclusion, running a successful vibration test is difficult. A good vibration test lab will make it look easy, but there are many specialized skills and knowledge required. We hope that this two part article will help you gain perspective from a vibration test lab’s point of view and to understand what information that you need to provide to perform a successful vibration test. Most importantly, good communications is essential for a positive experience. DES looks forward to performing your next vibration test!
Again, a great article. It is true that communication and proper organisation are very key in having a successful vibration test completed.
I really like how you talked about how doing a test to take vibration measurements should look easy by the pros, but it requires a lot of knowledge and skill. A friend of mine was talking to me about working with vibration measurements, and I had no idea what he was talking about. I’m glad I found your article so I could learn a little bit more about testing for vibration measurements, and everything that goes into it!